
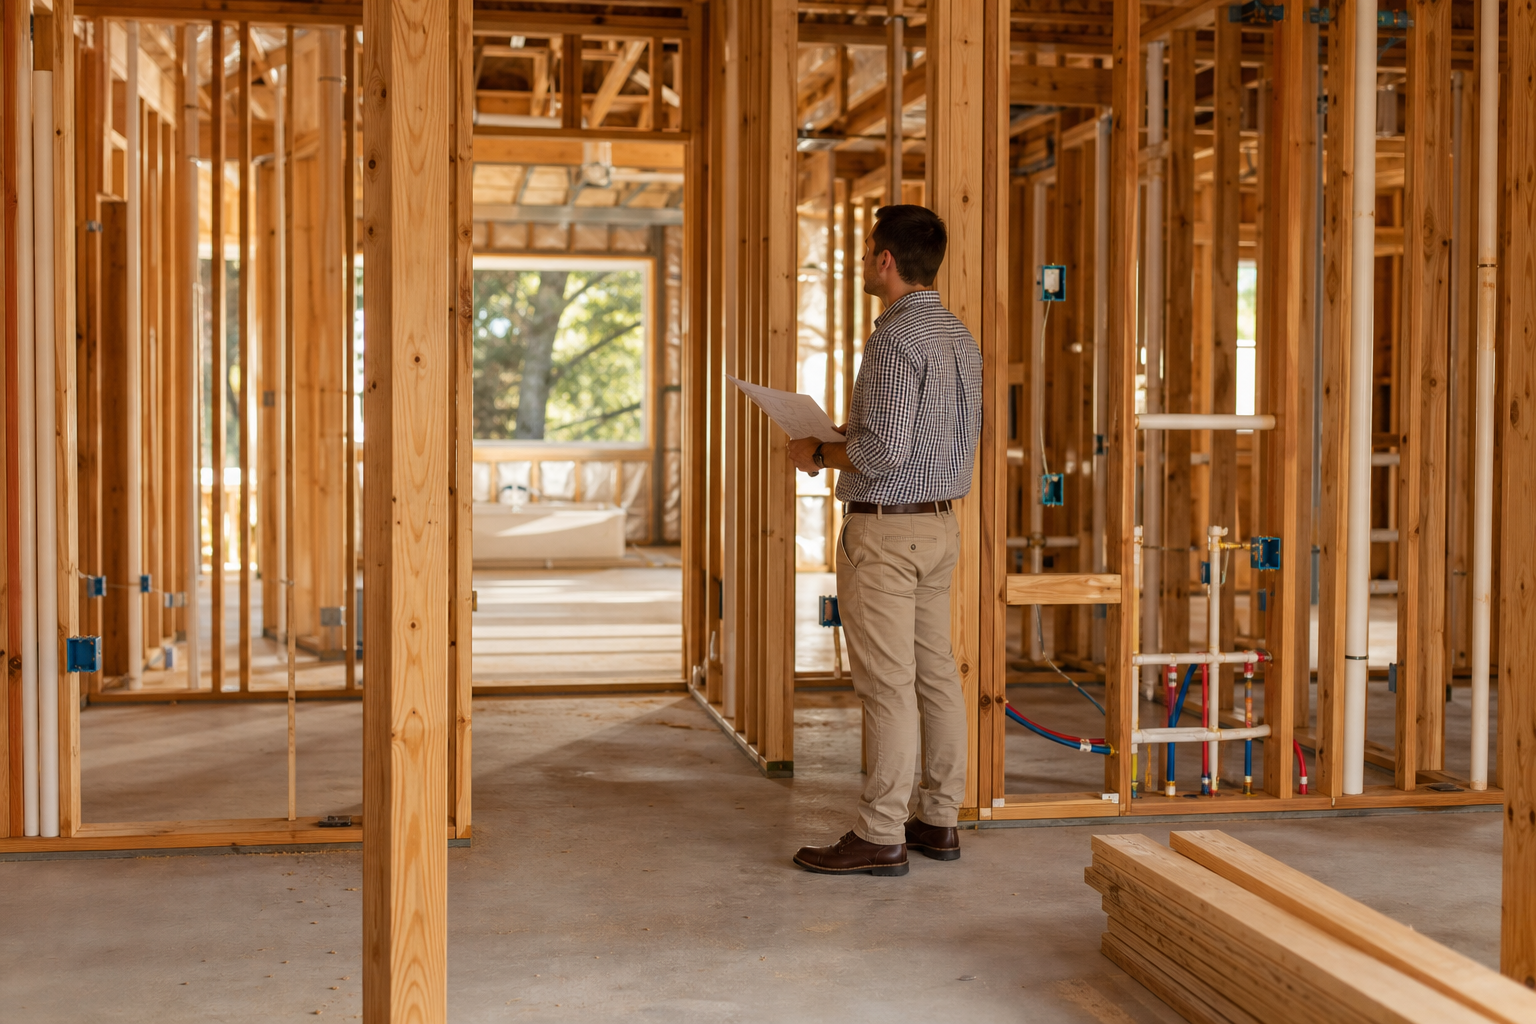
Before insulation and drywall close up the walls, the pre drywall walkthrough checklist should cover five categories: the air and water barrier envelope, structural framing and connections, all rough-in trades (electrical, plumbing, HVAC, low voltage), backing and blocking for future fixtures, and written confirmation that any field changes match approved plans. Photographing and, where applicable, testing each category before cover creates a record that is difficult or impossible to recreate once drywall goes up.
This article organizes a hold-point checklist using publicly available guidance on thermal enclosure systems and residential plan review, but it is not a substitute for the inspection sequence, code list, or approval criteria set by the authority having jurisdiction for a specific project. Homeowners and builders should confirm current requirements with the local building department and any licensed design professional of record before relying on any checklist, including this one.
Why a Pre-Drywall Walkthrough Matters
Once drywall is installed, most of what happens behind it becomes invisible for the life of the house. Air sealing details, flashing laps, structural connections, and rough-in placement can only be verified visually, or with certain tests, while they are still exposed. A pre drywall walkthrough checklist gives homeowners and project teams a structured way to review this work before it disappears, rather than relying on memory or assumption after the fact.
This is not a replacement for any inspection performed by a local code official. It is a separate, homeowner-facing review that can happen alongside or in addition to jurisdictional inspections. The goal is documentation: photographs, notes, and test results that create a record tied to a specific date and construction stage, so that if a question arises later, there is something concrete to refer back to.
What the Responsible Public Authority Documents
Local code enforcement offices, such as Mecklenburg County Code Enforcement, publish their own residential plan review and inspection expectations, and these can vary by jurisdiction and by project type. The Mecklenburg County Code Enforcement residential plan review page is one example of a public source that outlines the review process a jurisdiction may follow, but it should be treated as a starting point for questions, not a complete checklist for every project.
Separately, ENERGY STAR publishes general program information about the Single-Family New Homes certification process and about what it describes as a complete thermal enclosure system. These are voluntary program resources, not building code, and they describe concepts like continuous air barriers and insulation contact rather than a specific jurisdiction's required inspection sequence. Any homeowner or builder considering program participation should review the ENERGY STAR program requirements directly and confirm eligibility and process details with the program administrator.
Because inspection checklists, required hold points, and documentation expectations can differ from one jurisdiction to the next and can change over time, this article does not attempt to list a specific code requirement as if it applies everywhere. Readers should verify current requirements for their project with the authority having jurisdiction before finalizing a walkthrough plan.
Decision Inputs to Collect Before Work Proceeds
Before a pre-drywall walkthrough happens, it helps to gather a few pieces of information so the walkthrough is organized around what actually needs review rather than a generic list. This includes the approved plan set, any change orders or field revisions documented since permitting, the rough-in trade schedule, and a copy of whatever inspection sequence the local jurisdiction requires for the project.
It also helps to know which, if any, third-party testing is planned, such as a blower door test or duct leakage test, and at what construction stage that testing is scheduled. Coordinating the pre-drywall walkthrough with these tests, when practical, can reduce the number of separate site visits and allow air sealing issues to be caught and addressed before insulation covers the wall cavities.
Homeowners working with a design professional or structural engineer should also confirm whether that professional expects to review any framing or connection details in person or through submitted photographs before the work is enclosed. This is particularly relevant for engineered connections, shear walls, or any framing that deviates from a standard prescriptive design.
- Confirm the current approved plan set and any documented change orders.
- Ask the general contractor which rough-in trades are complete and ready for review.
- Ask whether any third-party testing, such as a blower door test, is scheduled before or after the walkthrough.
- Confirm whether a structural engineer or designer needs to review any specific framing detail before cover.
A Step-by-Step Owner and Project-Team Checklist
A pre drywall walkthrough checklist works best when it moves through the house in a consistent order and groups items by category rather than by room. The five categories below, envelope, structure, rough-ins, backing, and approved changes, give a repeatable structure that can be used on more than one project.
For the envelope, this includes reviewing the air barrier for continuity around penetrations, windows, and top and bottom plates, along with window and door flashing laps that direct water outward and downward. For structure, this includes visible framing connections, any engineered hardware, and blocking required for shear or lateral resistance. For rough-ins, this includes verifying that electrical, plumbing, and HVAC work is complete enough to review, with attention to penetrations through the air barrier and any fire-blocking that may be required. For backing, this includes blocking installed for future cabinets, grab bars, wall-mounted fixtures, and heavy items like televisions or shelving. For approved changes, this includes confirming that any field revision matches what was actually approved, rather than a verbal understanding from a site visit.
- Envelope: review air barrier continuity at penetrations, top plates, and window and door rough openings.
- Envelope: review flashing laps at windows and at roof-to-wall intersections for a shingle-style water path.
- Structure: photograph framing connections, engineered hardware, and any required blocking before it is covered.
- Rough-ins: confirm electrical, plumbing, and HVAC rough-in is complete and photographed by room.
- Rough-ins: note any penetrations through the air barrier that need sealing before insulation.
- Backing: confirm blocking locations for cabinets, grab bars, and wall-mounted fixtures match the plan.
- Approved changes: compare any field revision against the documented change order, not a verbal agreement.
Documentation and Hold Points
A hold point is simply a stage in construction where work should not proceed until a review has happened and been documented. For a pre-drywall walkthrough, this typically means insulation and drywall installation are paused until photographs and notes are captured and, if applicable, until any required inspection has been passed by the local jurisdiction.
Photographs should be organized by room or wall section and dated, ideally with a running list that ties each photo to a specific checklist item. This does not need to be complicated, but it should be consistent enough that someone unfamiliar with the project could look at the photo set later and understand what was reviewed and when. Keeping this documentation with the project file, alongside the approved plans and any change orders, makes it easier to reference later if a question comes up about what is behind a wall.
Homeowners should ask their contractor how photographs and hold points are documented on their specific project, since practices vary. This is a reasonable question to ask before framing begins, not after drywall is scheduled.
Common Coordination Failures and How to Catch Them
Many issues found after drywall closes trace back to coordination gaps between trades rather than a single obvious mistake. An HVAC penetration through an air barrier detail that was sealed during framing, a plumbing rough-in that shifted blocking meant for a future vanity, or an electrical box that was relocated without updating the backing plan are all examples of small coordination failures that are easy to miss without a structured walkthrough.
Thermal bridging is another area that is easy to overlook because it is not a single failure point but a pattern across the framing. Areas where framing members interrupt continuous insulation, such as corners, headers, and rim joists, deserve specific attention during a pre-drywall review, since they are difficult to evaluate once insulation is installed.
A written checklist reviewed by more than one person, ideally including someone who was not directly involved in the rough-in work, tends to catch more of these coordination issues than a single walkthrough by one person alone. This is one reason a structured pre drywall walkthrough checklist is useful even on smaller custom home projects.
- Recheck air barrier continuity anywhere a later trade worked after the initial air sealing pass.
- Confirm backing locations against the current plan, not the plan from before a field change.
- Look specifically at corners, headers, and rim joists for framing that may interrupt continuous insulation.
- Ask whether more than one person reviewed the checklist before drywall installation began.
Questions for the Responsible Authority or Qualified Professional
Because inspection sequences and documentation expectations vary by jurisdiction, homeowners should bring specific questions to their local code enforcement office and to their design professional rather than assuming a single checklist applies everywhere. This is especially true for anything related to structural connections, fire-rated assemblies, or energy code compliance paths, all of which are outside the scope of a general homeowner checklist.
Questions worth asking include which inspections are required before insulation and drywall at this specific address, whether any third-party testing is required or optional for this project, and whether the design professional of record wants to review any specific detail in person before it is covered. These questions are best asked early, ideally before framing begins, so that the walkthrough can be scheduled without delaying subsequent trades unnecessarily.
Any structural, code-compliance, or energy-performance question that goes beyond general documentation practice should be directed to the licensed professional or public authority responsible for that area, rather than answered by a general contractor or a general checklist.
- Ask the local code enforcement office which inspections apply before insulation and drywall for this project.
- Ask whether any third-party performance testing is required or planned, and at what construction stage.
- Ask the design professional of record whether any specific detail needs an in-person review before cover.
- Confirm who is responsible for scheduling and documenting the pre-drywall walkthrough on this project.
Next Steps for Homeowners Planning a Custom Home Build
A pre drywall walkthrough checklist is one part of a broader custom home building planning process that includes plan review, permitting, trade sequencing, and inspections at multiple stages. Homeowners working through this process benefit from asking their builder early how pre-drywall documentation will be handled, rather than raising the question once framing is already underway.
Cooper Development Group works on custom home and remodeling projects across the Carolinas and can discuss how a project-specific walkthrough and documentation approach might be structured for a given scope of work. Readers can review related building envelope topics on the CDG blog, look at the energy-efficient builds resource for the Lake Wylie, SC area, or reach out through the consultation page to discuss a specific project's planning needs.
- Review related building envelope articles on the CDG blog for more detail on specific topics like blower door testing or air barrier continuity.
- Visit the energy-efficient builds Lake Wylie, SC resource page for related project context.
- Use the consultation page to start a conversation about a specific custom home project's planning needs.
Questions homeowners ask
What should be photographed before drywall goes up?
Photographs should generally cover the air barrier at penetrations and rough openings, window and door flashing laps, visible structural connections and blocking, completed rough-in work for electrical, plumbing, and HVAC, and backing installed for future fixtures. The exact list can vary by project, so homeowners should confirm the specific scope with their contractor and, where relevant, their design professional.
Is a pre-drywall walkthrough the same as a code inspection?
No. A pre-drywall walkthrough is a homeowner or project-team review that documents conditions before cover, while a code inspection is performed by the local authority having jurisdiction, such as a county code enforcement office, according to its own required inspection sequence. Homeowners should verify with their local jurisdiction, such as Mecklenburg County Code Enforcement, which inspections are required for their specific project.
Does a blower door test need to happen before or after drywall?
Blower door testing timing depends on the program or project requirements involved and can occur at more than one construction stage depending on the goal of the test. Homeowners should ask their builder or, if applicable, their energy program administrator when testing is planned for their specific project rather than assuming a single standard timing applies.
Who should be present for the pre-drywall walkthrough?
Practices vary, but many walkthroughs include the general contractor or project manager along with the homeowner, and may also include a design professional or engineer if a specific detail needs review. Some projects also involve a separate reviewer who was not part of the original rough-in work, since a second set of eyes can catch coordination issues that the original trades may not notice.
Plan the next step
Use this article as a planning aid, then confirm project-specific requirements with the responsible authority and qualified professionals. Review CDG's related service, construction articles, or consultation page when you are ready to organize the next decision.
Official sources and verification
- ENERGY STAR: Single-Family New Homes Certification Process
- ENERGY STAR: Complete Thermal Enclosure System
- Mecklenburg County Code Enforcement: Residential Plan Review Services
Authority pages, forms, fees, review steps, and code references can change. Verify the current path for the property and scope before relying on a planning assumption.